

This is a soft and buttery old-fashioned yeast dinner rolls recipe with sweet honey, butter, and they are SO FLUFFY.
Just like the perfect Soft Fluffy French Bread, I have the perfect, softest fluffy rolls recipe. This easy yeast roll recipe makes at least 24-30 big soft fluffy dinner rolls. You could make 36 on the small/medium side. This is a large batch dinner roll recipe, but you can easily half it to make 12-15 rolls. It's the PERFECT Thanksgiving rolls recipe because it makes a lot, and it goes so quickly once you learn how to roll them out bakery style!

It's been a decade of developing and tweaking this, THE BEST yeast rolls recipe, until we got it JUST right. It is tried and true, and I haven't changed a thing for years. There's no shortening, processed sugar, or oil in the recipe. Just good old-fashioned honey, yeast, and butter! They taste just like ya grandmas dinner rolls. Absolutely heavenly with a little bit of Honey Butter Spread.
Something I love about this soft bread rolls recipe is that you can make the rolls overnight, or freeze them super easy. You can either freeze them once the rolls are cooled, or the raw dough. The instructions for thawing and baking the raw dough balls are similar to store bought frozen rolls.
Jump to:
What To Expect
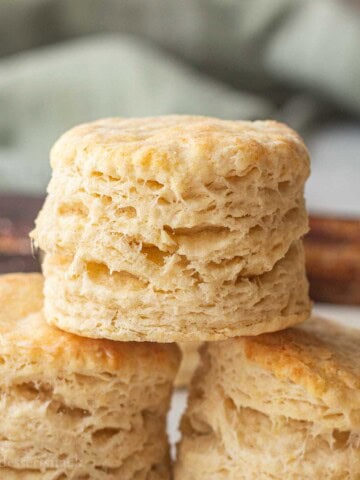
- Taste: These are big fat dinner rolls that are soft, fluffy, and perfectly baked. There's just enough salt and butter to make them delicious!
- Ease: This is a pretty easy dinner rolls recipe. It is straightforward and there is only 7 ingredients. It just takes some time and practice to make the rolls round and evenly sized!
- Time: Usually it takes about 3 hours to make the rolls. 10 minutes to mix, 1 hour to rise, 15-20 minutes to cut and roll, 1 hour for second rise, and 15 minutes to bake. The rise times may vary depending on how warm the room is, but it's easy to speed up the rise time!
🛒 Key Ingredients

- Flour - all-purpose is what I've consistently used over the years and works best for me.
- Honey - no processed sugars here! I have used regular white sugar in years past (it was fine) but I switched to honey because it makes better dough. Better tasting, better to work with.
- Yeast - active dry yeast or instant yeast work great for this recipe. The only difference is the active dry yeast needs warm water, sweetener, and a few minutes to activate before putting it into the recipe. Instant yeast can be added right into the bowl without activating it first.
- Water - it makes the magic happen with these rolls. Milk adds a little too much fat to the dough, making the rolls less fluffy when rising.
- Butter - some fat is necessary for the rolls to be not just fluffy, but fluffy for days! These rolls last for 3-4 days and are still fluffy.
- Eggs - act as a binder but also help enrich the dough so the rolls stay fresh longer.
- Salt - the MOST important flavor enhancer! Bread without salt is not good.
✏️ Substitutions & Variations
- Honey - to make the rolls safe for babies under 1 year old, honey can be substituted with the same amount of agave nectar, pure maple syrup, white, brown, or coconut sugar. The dry ingredients don't affect the dough very much.
- Butter - for a dairy friendly option, switch out the butter with shortening.
- Water - can be swapped out for fat free skim or 1% milk, or your favorite plant-based milk.
- Flour - Bread flour or whole wheat flour may be used, but since they can absorb more liquid I would decrease the amount by ½ cup ( approx. 70g) and add more flour if needed.
🧑🍳 Instructions

- Step 1. In a glass measuring cup or small bowl, combine the warm water (100-110℉), honey, and active dry yeast. Water temperature is important. Too hot and the yeast will die, too cold and it takes much longer to activate. Yeast begins to die at around 120℉.

- Step 2. In a large mixing bowl, combine softened butter, eggs, salt, and flour. I like to place my bowl on a scale, zero it out, and then add the flour to make sure I have the correct weight.

- Step 3. Pour in yeast and flour mixture. Knead for 7-10 minutes by hand (or 5-7 minutes in an electric mixer) until dough is elastic and smooth. Transfer dough to an oiled bowl and cover. Let rise for 1 hour or until almost doubled in size.

- Step 4. Divide the dough into 30 even balls (golf ball sized), usually 58-60 grams each. I like to weigh the dough and divide it by 30 to calculate how much each ball of dough should weigh. I cut about half of the rolls, roll them into the pan, and then cut and roll the other half.
If making 24 rolls = about 72-73 grams each. For 36 rolls, about 49- 50 grams each.

- Step 5. Roll each dough ball into a smooth ball by cupping the hand in a "C" shape over the roll and moving it around in a small circle on a flat work surface. Pressing your hand into the roll and putting pressure on it will help to keep the top in place while the circular motion drags the edges under, stretching the dough to make it smooth and even on top. Practice doing it with both hands! (Video below Step 6)

- Step 6. Transfer each ball into a greased 11 x 18 inch baking pan with rims, about 6 rows of 5 rolls. Spray with baking spray (so they don't dry out) and cover to rise for 1 hour until doubled in size (gaps should be filled in), then check them. They may need a little longer if it's cooler. Make sure to set a timer so they don't rise too much! Overproofing can make them collapse a little in the oven and they won't be as fluffy.
Tip: Set the timer for 45 minutes while the rolls are rising so you can turn the oven on to 375 degrees to preheat for the last 15-20 minutes of the rising time.

- Step 7. Bake the rolls at 375℉ for 15-16 minutes on the bottom shelf. This well help make sure the bottoms are nice and browned.

- Step 8. After removing the rolls from the oven, melt 2-3 Tablespoons of butter and brush the tops of the rolls while they're still hot. I've also rubbed the butter stick straight onto the hot rolls, use whichever method you like!
⏲️ Make Ahead/Overnight Instructions
- Make the dough.
- Do the first rise.
- Shape the rolls and lightly spray them with baking spray to prevent them from drying out.
- Cover with plastic wrap and refrigerate the dough balls before they rise again. I usually do this in two 9x13 pans or one large 11x18 inch pan if I have enough fridge space.
- The next day, give them 1-3 hours out of the fridge (still covered) to rise depending on how cold it is in the room, make sure they are doubled in size or they'll be dense and stodgy when baked.
- Bake away!
📌 Top Tips & Hacks
- Weigh your flour! You will consistently get good results when you weigh your ingredients. Things like butter and eggs are roughly the same amounts, but flour can be tricky to get right without a scale. This is my favorite kitchen scale that I've used for years.
- If you're not sure your scale is weighing right, you can test the scale for accuracy with a stick of butter that has a set weight. Zero out the scale, set the butter on it, and make sure it's 113 g.
- Watch my video in the recipe notes to learn how to roll out dinner rolls bakery style! You can learn one-handed, but it's better to practice with both hands to roll out the rolls quickly and efficiently.
- Practice practice practice. I worked at a bakery in college and learned how to roll out hundreds of rolls quickly. Keep at it! It's all muscle memory, and it goes so quickly once you get the hang of it!
- Butter on the rolls! You can either rub the butter stick straight onto the dinner rolls or melt 2-3 Tablespoons and brush the butter on with a pastry brush. It is the perfect shiny touch and helps to soften up the tops a little right before serving.

❓Frequently Asked Questions
Usually the answer is yeast. If the water was too hot, it could kill it. If the rolls don't rise long enough (not doubled in size, they will be dense and doughy when baked. If they rose too much, they collapse in the oven and aren't as fluffy.
We say "room temperature", which means about 70℉-77℉ (21-25℃). Any colder an they take longer to rise, any higher and they may rise too quickly or kill the yeast.
Yes! Freeze up to 3 months baked or raw.
Follow recipe until Step 6: make dough, let rise ONCE, roll into balls, and freeze dough balls individually.
Bake from frozen: Place dough balls onto a greased baking sheet, cover, and let thaw and rise for 4-5 hours. Placing in a warm area (oven preheated for 2 minutes) will speed up the thawing and rise time. Bake as directed in recipe, but be sure to remove rolls before preheating oven all the way if rising in the oven.
Ingredients and technique. The fat from the butter and eggs enrich the roll dough, helping them to stay soft and fresh for days after baking, along with kneading the dough for the correct amount of time, and making sure they rise TWICE. Buttering the tops after they bake help too!
Store in an airtight container, away from heat. If they've already started to dry out, place a few slices of soft fresh bread in the container and leave overnight to soften them up a bit.
Room Temperature: 3 days
Frozen (after baking): 3 months.
Microwave for 5-10 seconds or warm in the oven (6 or more) covered in foil for 10 minutes at 350℉.
🥖 More Delicious Bread Recipes


Did You Try This Recipe? ⭐️⭐️⭐️⭐️⭐️ Make sure to leave a star rating and a comment below the recipe card. I love hearing from you, and it is so helpful to other readers! Better yet, share it with family and friends. Thank you!!
📝 Printable Recipe

Old Fashioned Yeast Rolls
Ingredients
- 2 cups warm water (100-110℉) 475 mL
- ¼ cup honey 85 g
- 4 teaspoons active dry yeast 14 g
- ½ cup salted butter, softened 113 g
- 2 eggs
- 2½ teaspoons salt
- 7 cups all purpose flour 1000 g
- 3-4 Tablespoons melted butter for tops of rolls
Instructions
- In a bowl, stir together the warm water (100-110℉), honey, and active dry yeast. Water temperature is important. Let rest 5 minutes until yeast becomes foamy on top.2 cups warm water (100-110℉), ¼ cup honey, 4 teaspoons active dry yeast
- In a large mixing bowl, combine softened butter, eggs, salt, and flour. I like to place my bowl on a scale, zero it out, and then add the flour to make sure I have the correct weight.½ cup salted butter, softened, 2 eggs, 2½ teaspoons salt, 7 cups all purpose flour
- Pour in yeast and flour mixture. Knead for 7-10 minutes by hand (or 5-7 minutes in an electric mixer with a dough hook) until dough is elastic and smooth. Transfer dough to an oiled bowl and cover with plastic wrap or dish towel. Let rise for 1 hour or until almost doubled in size.
- Divide the dough into 30 even balls (golf ball sized), usually 58-60 grams each. I cut and roll half, then cut and roll the other half. You can weigh the dough, then divide it by 30 to calculate how much each ball of dough should weigh.
- Roll each dough ball into a smooth ball by cupping the hand in a "C" shape over the roll and moving it around in a small circle on a flat work surface. Pressing your hand gently onto the roll and putting pressure on it will help to keep the top in place while the circular motion drags the edges under, stretching the dough taught to make it smooth and even on top. Practice doing it with both hands!
- Transfer rolls into a greased 11 x 18 inch baking pan with rims, about 6 rows of 5 rolls. Spray with baking spray (so they don't dry out) and cover to rise for about 1 hour until doubled in size (gaps should be filled in), then check them. They may need a little longerto rise if it's cooler. Preheat the oven to 375℉ at the 45-50 minute mark.
- Bake at 375℉ for 15-16 minutes on the middle or bottom shelf. This well help make sure the bottoms are nice and browned.
- After removing the rolls from the oven, melt 3-4 Tablespoons of butter and brush the tops of the rolls while they're still hot. I've also rubbed the butter stick straight onto the hot rolls, use whichever method you like!3-4 Tablespoons melted butter for tops of rolls
Notes
- Follow recipe until Step 6: make dough, let rise ONCE, roll into balls, and freeze dough balls individually.


Lori says
This is THE ABSOLUTE BEST Recipe for yeast rolls!!! Hands down the BEST,& believe me,I've definitely made my fair share in my 47yrs of life! Thank You & I make this recipe again & again! My family loves it as much as I do! O, tha honey/ butter really hits on those hot, Delicious,light fluffy rolls!!! CanNot say enough about them!
Sheila M says
I made these for dinner the other night. Due to having a toddler running around I wasn’t able to roll out all of the dough. I just threw the rest off in a loaf pan. The rolls and the loaf were a big hit. I currently have a batch in its first rise now and I’m going to roll it out and make cinnamon rolls this morning. Everyone loved this recipe!
Brittany Neely says
Hi! How many rolls should I put on a disposable 9X13 sheet pan? I was thinking 12 but could I get 24 on there?
Sara says
I’ve only done 12-15 in a 9x13 pan, 24 would have to be super tiny.
Greg says
This recipe is exactly like the ones my grandmother made when I was a kid (way back in the 1900’s, like the kids today say) and I used it to make WV Pepperoni Rolls just like I remember. Just use to dough balls with 4 slices of pepperoni and half a slice of mozzarella sandwiched in between.
Thanks for bringing back my childhood in my 50’s.
Sara says
You’re so so welcome Greg! Made my heart happy to hear it. Some of my favorite recipes are the ones my Grandma used to make too. I’m so glad you came back to tell me! It always makes my day.
Jodie Chau says
Hi. Your conversation calculator does not change the metric measurement. It stays the same from 1x to 3x.
Sara says
Make sure you're toggled over to the metric units! I put the metric measurements in the ingredient notes since I had emails about it asking for metrics. The ingredient notes won't change, but the ingredient measurements will on the calculator.
Adrian says
Hey there typically bread flour usually weighs around 140 g a cup X 7 cups. But putting 1000g for metric. Which is it? I love this recipe I just want to have it correct, thanks!
Sara says
I always do 1000g and weigh ingredients, and put cups for my mostly US audience measuring in cups. 1000g evens out to about 142g a cup, not exact but close enough. If you see metrics in my recipes, it means I weigh ingredients out myself and I don't rely on a conversion tool since they're not always reliable. Hope that helps, so glad you enjoy the recipe!
John Wiley says
Great recipe! Happy family here. They were very light and fluffy, but quite versatile for what to do them. I added a little bit of sourdough discard as well, which worked nicely.
JAMIE L ELLIS says
I made these rolls today for our family Christmas Dinner and we all loved them.Every one of my daughters and granddaughters wanted the recipe so I shared it with them. They said tell you they love them and thank you so very much. So our family will be following you from now on.
Sara says
I love that! Thanks for letting me be a part of your holiday in a small way. And thank you for coming back to tell me, it always makes my day!! Merry Christmas to you and yours.
Fay says
can I use milk and water?
Sara Syphus Smith says
You can, I used to use only milk but had best results when I used less fat like skim or 1% considering the amount of butter fat in the dough. You could use a mixture of half milk and water and be just fine.
Jen says
How long would you recommend keeping in the fridge vs freezing? For example, if I made the dough on Sunday and planned to bake on Wednesday would you recommend freezing or keeping in the fridge? Or combo of both?
Sara says
I would make the dough, let it rise, shape into rolls, then freeze. Then thaw, let rise and bake on Wednesday.