Old Fashioned Pie Crust (all butter)
This is a dependable, old fashioned all butter crust (top and bottom crust) that's full of buttery flavor, flaky layers, and no shrinking!
Servings: 2 9 inch crusts
Calories: 176kcal
Equipment
Ingredients
- 2½ cups all purpose flour 338g
- ½ teaspoon salt 3g
- 1 teaspoon granulated sugar 4g
- 1 cup cold salted butter 226 g
- ¾ cup ice water 177 mL, more as needed
Instructions
- Put butter in the freezer and fill a large measuring cup with about 1 cup of cold water and several ice cubes. Mix dry ingredients: place 2½ cups all purpose flour, ½ teaspoon salt, and 1 teaspoon granulated sugar in a bowl.
- Remove the butter from the freezer and grate 1 cup cold salted butter into the flour using a cheese grater. With aggression. Be quick! See note 1. Alternate method: cut the butter up into cubes to cut into the flour using a fork or fingers.
- To the dry ingredients, add ¾ cup ice water and press the mixture together gently until dough forms. Add the minimum amount of water, then add more water 1 Tablespoon at a time if needed to the dry crumbs at the bottom of the bowl. Mix until the dough JUST comes together. It shouldn't crumble, and shouldn't be super wet or sticky, and won't be all the way smooth since there are butter crumbles.
- Divide the dough into two portions and shape the dough into discs. Wrap with plastic wrap and chill in the fridge for AT LEAST 30 minutes. See note 2.
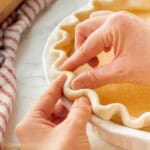
- After refrigerating your dough is ready to roll out and use! For a single crust pie, trim dough to about ½ inch / 1 cm all the way around the outside edge of the pie plate. Tuck the extra dough underneath itself, and press it gently to make it even with the edge of the pie plate.
- To blind bake the crust (for fillings that don't need baking) fill the pie crust with parchment paper and pie weights or dried beans and bake at 425 ℉ for 18-20 minutes, remove the pie weights and parchment, and bake another 5 minutes or more until the bottom is set and dry. Cool completely before filling. To bake with a filling, follow your pie recipe instructions. Uncooked fruit fillings will bake for different times than pre-cooked fruit fillings. For example if I used my homemade apple pie filling with a double or lattice crust, I'd bake at 400℉ for 20 minutes, then lower the oven temperature to 350℉ and bake for another 40-45 minutes.
Notes
Note 1: I usually grate one stick into the flour and pop it into the freezer for a minute or two while I grate the other stick onto a plate, then pour it into the flour with the rest of the butter.
Note 2: Chill for 1-2 hours if the weather is hot. You can decrease the chill time to 20 minutes by chilling in the freezer.
Troubleshooting
- Crumbly dough - not enough water! Make sure to use enough that it's a workable dough before chilling it in the fridge. If it's dry and crumbly before chilling, it'll be worse rolling it out.
- Tough pie crust - prevent this by not overworking the dough and not making it wet and sticky.
Nutrition
Serving: 1slice top/bottom crust | Calories: 176kcal | Carbohydrates: 15g | Protein: 2g | Fat: 12g | Saturated Fat: 7g | Polyunsaturated Fat: 1g | Monounsaturated Fat: 3g | Trans Fat: 0.5g | Cholesterol: 31mg | Sodium: 166mg | Potassium: 25mg | Fiber: 1g | Sugar: 0.3g | Vitamin A: 360IU | Calcium: 6mg | Iron: 1mg
