
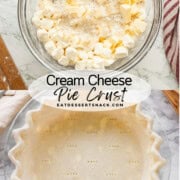
Pie dough with cream cheese! Half cream cheese, half butter, all delicious goodness. Stays flaky and tastes amazing! Makes enough for one top and bottom crust or two bottom crusts.
Cream cheese pie dough pairs AMAZINGLY well with my Homemade Cherry Pie Filling, Blueberry Pie Filling, or a classic Old Fashioned Apple Pie Filling, all of which are easy to make and SO delicious!
A combination of both butter and cream cheese are used, butter is a more stable fat than cream cheese and is needed to help the dough nice and flaky.

I adore this pie crust recipe because it works well with sweet or savory pies like Chicken Pot Pie with Frozen Veggies minus the sugar in the dough. It has never failed me!
I'll start with what I don't like about most pie crust recipes, except old fashioned all butter pie crust and this one, of course. The ones made with all shortening, you can usually tell. They don't have much flavor. Other pie crusts I've had are tough. This is usually because the dough has been worked too much, or there's too much water, and gluten strands start to develop like in bread dough. On the other hand, I've had some pies where the crust crumbles to bits as you're transferring a slice of pie to the plate. Flakey, but too crumbly to hold together. This one is both flaky, crispy, and sturdy, see the last picture in the post.
Jump to:
What To Expect
- Taste: Buttery and a little more rich from the cream cheese. Makes a nice sturdy crust that is more crispy than shortcrust in texture.
- Ease: it's a straightforward pie crust recipe, medium level difficulty, but as long as you work with cold ingredients and follow the instructions it turns out wonderful! This recipe can be done by hand or with a food processor.
- Time: It only takes a few minutes to put together the pie crust with cream cheese, it just takes 30 minutes to chill before rolling out for pie.
🛒 Key Ingredients

- Cream Cheese - I use full fat, but ⅓ fat or fat free could also be used.
- Butter - a more stable fat than cream cheese, a ration of at least ½ butter and ½ cream cheese must be used.
- Flour - all-purpose flour is used because it's easiest and cost-efficient.
- Salt - a little is added for flavor, it definitely makes a difference!
- COLD Water - water acts as the binder in the crust and the temperature helps to keep the butter and cream cheese from melting together and keeps the crust flaky when baked!
See the recipe card below for full information on ingredients and quantities.
✏️ Substitutions & Variations
- Cream Cheese- fat free or ⅓ fat may be used in place of full fat cream cheese.
- Sugar - you can leave it out for savory crusts or replace it with coconut sugar.
🧑🍳 Instructions
Begin with cold ingredients! It's important that the butter and cream cheese are refrigerated. I put a cup or two of water in a measuring cup and add ice to get it ready for the crust.

- Step 1. Cut chilled butter and cream cheese into cubes.
TIP: It helps to dip the cream cheese and knife in a bit of flour so it doesn't stick to the knife when cutting into cubes.

- Step 2. In a large mixing bowl combine cold flour, sugar, and salt.

- Step 3. Add chilled butter and cream cheese (cut into small pieces beforehand for easier mixing).

- Step 4. Using a fork or pastry blender, (or food processor or mixer with this pastry attachment) work cream cheese and butter into dry ingredients until there are pea-sized chunks or smaller, (chunk size is important for flakiness) and the mixture resembles very coarse sand.

- Step 5 Add cold water ¼ cup at a time and mix until the dough is combined and workable, with a stiff play dough texture. Depending on the temperature of the ingredients, more or less water may be needed. Try not to work the dough too much (this makes it tough), just enough to not be crumbly.

- Step 6. Divide into two discs and use immediately or wrap in plastic wrap for a later use. Before rolling out, smooth and press the edges of the disc until there are no cracks. This helps prevent any big cracking while rolling out the pie crust.

- Step 7. Roll out dough to about ⅛ inch (¼ cm) thick and transfer to 9 inch pie pan. Trim edges of dough from pan with butter knife or kitchen shears.
TIP: I leave about 1 inch of excess when trimming the crust, then tuck it underneath to make a thicker edge to crimp.

- Step 8. At this point, you could crimp the crust and blind bake the crust (instructions below) for a cold pudding/ fruit pie or fill the raw pie crust with something like cream cheese pumpkin pie filling or make Caramel Apple Pie filling to bake.
📌 Top Tips & Hacks
- Use COLD butter, COLD cream cheese, and COLD water. The more they melt, the less flaky and tender the dough will be.
- If you're not using a food processor (like me) chill the dry ingredients and mixing bowl in the fridge or freezer for 20 minutes. Cold ingredients are your pie crust friends.
- Don't overwork the dough! Kneading it too much makes it tougher. Combine all ingredients until it's a workable dough, then roll it out or chill for later use.
- Add a teaspoon of spice to the mix to make it extra tasty! I add cinnamon or nutmeg for sweet, and garlic powder or onion powder for savory. Totally optional, totally delicious.
- Blind bake to avoid a soggy bottom pie crust. I will explain all in "How to avoid a soggy bottom pie crust" in the Frequenly Asked Questions section below.

❓Frequently Asked Questions
YES! I do this all the time. Freeze for up to 3 months, and thaw completely before rolling out. Refrigerate up to 3 days and let rest at room temperature before rolling out so the dough will be easier to work with.
How to par-bake (partial bake) your crust:
Preheat oven to 400 ℉
1. Line the crust with parchment paper, foil, or I use plastic wrap (I'm a rebel. but it doesn't melt.) and fill with 1.5 to 2 cups dried beans or rice. DO IT. If you try to blind bake without filling it first this crust will puff and melt and won't be useable and you will be sad.
2. Bake for 15-20 minutes, or until pie crust is slightly set. It shouldn't be browning at all. Remove dried beans and let cool slightly before filling, then bake according to recipe instructions.
1. Line with parchment paper or foil and fill with 2 cups dried beans, rice, or baking weights. Bake at 400 F for 20-25 minutes or until light golden brown.
2. Remove parchment paper/foil and bake for another 10-12 minutes, until crust is golden brown.For pies that need to be baked after filling, the second bake will be only 5-10 minutes (i.e. pumpkin pie or quiches).
It definitely tastes better! It depends on the texture you like the most for pie crust. Shortening can lead to a more shortbread crumbly crust, and cream cheese and butter have a more crispy, flaky texture.
🥧 Our Favorite Easy Pie Recipes


Did You Try This Recipe? ⭐️⭐️⭐️⭐️⭐️ Make sure to leave a star rating and a comment below the recipe card. I love hearing from you, and it is so helpful to other readers! Better yet, share it with family and friends. Thank you!!
📝 Printable Recipe

Cream Cheese Pie Crust
Ingredients
- 3 cups all purpose flour 410 g
- 2 teaspoons sugar skip if doing a savory pie
- ¼ teaspoon salt
- ½ cup salted butter, cold 113 g
- 4 oz cream cheese, cold 113 g
- ¾-1 cup ice cold water 177-235 mL
Instructions
- Cut chilled butter and cream cheese into cubes. it helps to dip the cream cheese in a bit flour so it doesn't stick to the knife.
- In a large mixing bowl combine cold flour, sugar, and salt. Add chilled butter and cream cheese.
- Using a fork or pastry blender, work cream cheese and butter into dry ingredients until there are pea-sized chunks or less (chunk size is important for flakiness) and the mixture resembles very coarse sand.
- Add cold water ¼ cup at a time and mix until the dough is combined and workable, with a stiff play dough texture. Depending on the temperature of the ingredients, more or less water may be needed. Try not to work dough too much (this makes it tough), just enough to not be crumbly.
- Divide into two discs and use immediately or wrap in plastic wrap for a later use. Before rolling out, smooth and press the edges of the disc until there are no cracks. This helps prevent any big cracking while rolling out the pie crust.
- Roll out dough to about ⅛ inch (¼ cm) thick and transfer to 9 inch pie pan. Trim edges of dough from pan with butter knife and crimp edges by pinching pointer and thumb fingers together into a V shape and pressing dough between them.
If making a cold fruit or pudding pie (fully baked crust):
- Line with parchment paper or foil and fill with 2 cups dried beans, rice, or baking weights. Bake at 400 F for 20-25 minutes or until light golden brown. Remove parchment paper/foil and bake for another 10-12 minutes, until crust is golden brown. For pies that need to be baked after filling, the second bake will be only 5-10 minutes (i.e. pumpkin pie or quiches).

Yvette Nelson says
Is it okay to use a food processor to make this pie crust?
Sara says
Yes, just be careful not to over mix, it’s easy to break up the butter and cream cheese too small with a processor.
Lynne says
My plan is to blind bake this using a tart pan that has 6X6" tarts. Will the fat content of this recipe make a mess using this type of pan? I want to put lemon curd or creme brulee in the tart and a cream cheese crust sounds delicious.
Sara says
I’m afraid I have never used a tart pan for this recipe, so I cannot give an accurate answer. As long as it’s blind baked in a pan with raised edges and with pie weights it’s worked well for me however.
Sandy says
I am in the process of making this crust with the cherry pie filling! Am i to bake the bottom crust a bit before i put the filling in and a lattice top? How long and what temp?
Sara says
Hi Sandy, I only blind bake (baking before filling) the bottom crust if I am making pie with one crust, the directions are in the blog post.
If you are doing a lattice top, bake the pie as normal, making sure to cool the filling completely before putting it in the pie to prevent melting the butter in the dough.
Monika says
Is this enough for a bottom and top or just the bottom?
Thanks
Sara says
Both top and bottom!
Maryann says
Can you use this crust recipe for a pie with a top crust like a chicken pot pie or apple pie? If so, any tips?
Sara says
Yes you can, the recipe makes enough for a top and bottom crust. Just make sure your ingredients are cold, don’t overwork the dough or let it get warm, and put the pie into a fully preheated oven.
Jean says
I find I can make just about everything gluten free as long as I use the 1to1 measure baking flour. Make sure you don't use one with garbanzo bean flour. The bean flour taste will overwhelm baked goods
Terry says
Hi, this sounds really good! I have a question, can it be made with gluten free flour? Thank you.
Sara says
Hi Terry,
I haven’t tested this recipe with gluten free flour, but I’m confident you could make it. You might have to adjust the amount of flour a little to make the consistency right.
Amanda says
As a poor college student it's hard to find recipes that work every time, i can't afford to waste expensive (they're expensive for me ok i have a budget I need to stick to so don't judge me) ingredients like cream cheese and butter on recipes that are finicky and don't work every time. But THIS RECIPE HAS WORKED FOR ME EVERY TIME I"VE TRIED IT!!!! I just need to remember the basic rules of pie making and it my pies always turn out great.
1. keep the edges trimmed
2. keep the crust THIN (like cardboard thin, I keeps the grease drip down to a minimum)
3. bake at a high temp first, and then low.
Sara says
Exactly Amanda! I’m so glad you like the recipe and enjoyed it.
Pat Lang says
I am new to baking. If I use this for apple pie with top crust? I need to know what temperature and how long to bake?
Sara says
Hi Pat! For raw apple pie filling, I would bake at 400 F for 20 minutes, then lower the temperature to 375 F for another 35-40 minutes. I usually cover the top of the pie with tinfoil for the first 20 minutes so the crust doesn’t brown too quickly, then remove the tinfoil when I turn the oven temperature down.
Kyson says
Every time I’ve had this it was perfect. The crust was the perfect texture and tasted much better than regular pie crust that I’ve had. Thank you
Sara says
I’m so glad you enjoyed it Kyson. You’re very welcome!
Vicki says
I bake all the time and a cream cheese crust sounded divine , But this is too much cream cheese . The dripping of fat from the cream cheese and the butter started a minor fire in my oven . Hope I can salvage the pies. I also froze the pie for 30 min before baking .
Sara says
Hi Vicki,
I'm sorry that happened! This recipe has been tried and tested by many individuals, who all had positive feedback. Because of the high fat content of the dough like in many pastry recipes, fat dripping can happen and reabsorbs into the crust as it is cooling. Some helpful tips to keep in mind are to make sure that the oven is fully preheated, use pie weights or dried beans to weigh the crust for par baking, trim excess dough so no fat drips into the bottom of the oven, and use cold ingredients along with chilling the dough before baking. I also make sure to use the full amount of flour and good quality full fat cream cheese. Altitude can also have an effect on baking temperature and time needed.
Clarissa says
Hi! How do I bake this if I want it to be the crust for my pumpkin pie?? Like do I still blind bake? Help!!
Sara says
Hi Clarissa! I prefer not to blind bake it for a pumpkin pie to help keep the top of the crust softer, usually blind baking is just for pies that you won’t bake again, such as a banana cream pie. Sometimes people blind bake crust for a pumpkin pie to help the bottom crisp up, but when I’ve done that the top of the crust is very hard.
Clarissa says
Oh thank you!! How do you recommend I bake it with the pumpkin pie filling? This is my first time making my own crust for my homemade pumpkin pie!
Sara says
You’re welcome! I also have a pumpkin pie recipe with instructions for baking. There is the option to blind bake using this recipe, just make sure if you do to cover the edges of the crust with foil prevent over baking.
https://eatdessertsnack.com/best-pumpkin-pie-recipe/